
There’s something magical about certain desserts that immediately take us back to simpler times—Sunday dinners at Grandma’s, potluck tables brimming with sweet delights, or that familiar hum of chatter as family gathers around the kitchen island, waiting for their favorite dish to be served. One of those cherished classics in my household has always been Chocolate Lasagna.
Now, I know the name might surprise some, especially if your mind immediately jumps to a bubbling tomato-based casserole, but trust me—this layered dessert is as sweet and satisfying as anything you’ve ever had. It’s decadent yet surprisingly light, chocolatey without being overpowering, and it brings together some of the most beloved flavors in American dessert history.
When I first made this dessert back in the late ’80s for a PTA bake sale, I remember standing in my little kitchen in a floral apron, carefully layering Oreos, pudding, and creamy filling while my youngest played with his Hot Wheels at my feet. I had no idea it would become a family staple—requested at birthdays, holidays, and pretty much any occasion that called for a sweet treat. Over the years, I’ve added little touches—like a splash of almond extract for depth and freshly whipped cream when I had the time—that make this dish truly special.
Chocolate Lasagna has earned its place in our family’s recipe book not only because of its rich flavors and satisfying textures but because it’s so easy to prepare, even on a busy weeknight. And let’s not forget—it keeps well in the fridge, making it a great make-ahead dessert.
So let’s step into the kitchen together and create a layered dream that brings back memories and creates new ones, one delicious forkful at a time.
Ingredients Needed
For the Crust:
-
1 package (about 36 cookies) Oreos, finely crushed
-
6 tablespoons unsalted butter, melted
For the Cream Cheese Layer:
-
1 package (8 ounces) cream cheese, softened
-
1/4 cup powdered sugar
-
1 teaspoon almond extract (or vanilla extract, if preferred)
-
1 cup Cool Whip (or homemade whipped cream)
For the Pudding Layer:
-
2 packages (3.9 ounces each) instant chocolate pudding
-
3 1/4 cups cold milk
For the Topping:
-
1 1/2 cups Cool Whip (or more, depending on preference)
-
Chocolate shavings, mini chocolate chips, or Oreo crumbles for garnish
Optional Add-Ins or Swaps:
-
Use gluten-free sandwich cookies for a gluten-free version.
-
Swap almond extract for peppermint during the holidays for a festive twist.
-
Use light Cool Whip or reduced-fat cream cheese for a lighter version.
-
Add a thin layer of caramel sauce between the pudding and whipped topping for a turtle-style treat.
Step-by-Step Instructions
Step 1: Make the Crust
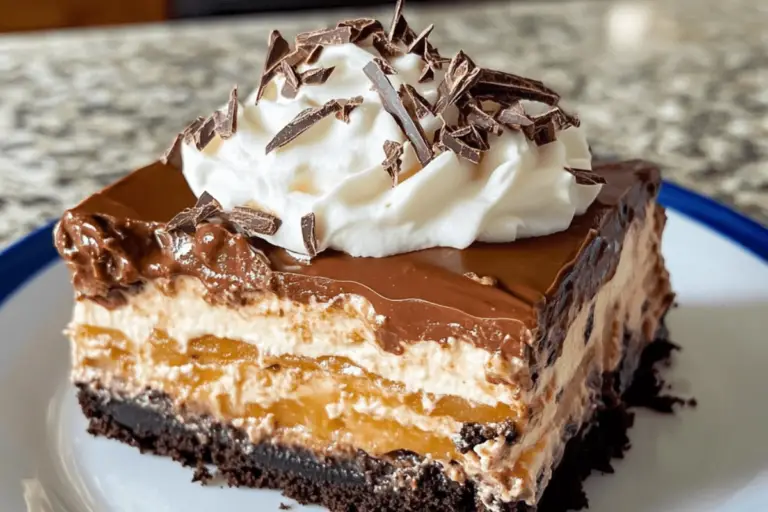
Start by crushing your Oreos. I like to toss them in a food processor for a nice fine crumb, but you can also place them in a zip-top bag and crush them with a rolling pin—just like my mother used to do. Combine the crushed cookies with the melted butter and press the mixture firmly into the bottom of a 9×13-inch dish. Place the dish in the fridge to chill while you prepare the next layer.
Step 2: Cream Cheese Filling
In a medium bowl, beat the softened cream cheese with powdered sugar and almond extract until smooth and creamy. Fold in 1 cup of Cool Whip and mix gently. Once combined, spread this mixture evenly over the chilled Oreo crust. Use an offset spatula to make the layer smooth. Return the dish to the fridge to firm up while you work on the pudding.
Step 3: Chocolate Pudding Layer
In a separate bowl, whisk together the instant chocolate pudding mixes and cold milk until thickened—this usually takes 2-3 minutes. The pudding should be thick but spreadable. Carefully spread the pudding over the cream cheese layer. Be gentle to avoid disturbing the layers beneath.
Step 4: Whipped Topping
Once the pudding layer is set, top the entire dessert with a generous layer of Cool Whip. Use a spatula to spread it evenly, creating soft swirls across the top for that classic homemade look.
Step 5: Garnish and Chill
Now for the fun part—garnishing! Sprinkle chocolate shavings, mini chocolate chips, or crushed Oreos over the whipped topping. For extra flair, add a dollop of whipped cream and a few dark chocolate curls just before serving. Chill for at least 4 hours, or overnight if you can wait. This allows the layers to set beautifully.
Why This Recipe Works
This layered dessert is a hit for several reasons. First, it strikes the perfect balance between rich chocolate and creamy, tangy sweetness from the cream cheese. The Oreo crust gives it a delightful crunch that contrasts beautifully with the silky pudding and whipped topping.
Health-wise, it’s easy to adapt. You can use low-fat or sugar-free ingredients without compromising flavor. It’s also incredibly versatile—you can dress it up or down depending on the occasion, and it’s always a crowd-pleaser.
From a preparation standpoint, this is a no-bake dessert that requires minimal tools and effort. Plus, it travels well, making it ideal for potlucks, parties, or any event where you want to wow guests without stress.
Variations & Customizations
Classic Southern-Style: Add a layer of chopped pecans and drizzle with caramel sauce for a praline twist.
Low-Calorie Option: Use sugar-free pudding, reduced-fat cream cheese, light whipped topping, and gluten-free cookies.
Gluten-Free Version: Replace Oreos with gluten-free chocolate sandwich cookies. Most large grocery stores carry them now!
Family-Friendly Fun: Let kids help build the layers and decorate the top with sprinkles or crushed candy bars. Use white chocolate or vanilla pudding for a “blonde” version.
Holiday Special: Add crushed peppermint candies between the layers during Christmas. In fall, mix a bit of pumpkin puree and cinnamon into the cream cheese layer.
Nutty Delight: Add a layer of chopped walnuts or hazelnuts between the cream cheese and pudding for texture and flavor.
Cooking Note
Growing up, my grandmother never had a food processor or even an electric mixer. She made desserts like this with a wooden spoon and a whole lot of patience. I still remember watching her stir cream cheese and sugar by hand, humming softly to Patsy Cline in the background. While we have the luxury of modern appliances now, there’s something to be said for doing things the old-fashioned way—if only to connect with the generations before us.
If you’re short on time, don’t worry. Most grocery stores now carry pre-crushed Oreo crumbs and even chocolate Cool Whip. But if you’re in the mood for tradition, crush those cookies yourself and whip your own cream. The difference is subtle, but the love shines through.
Serving Suggestions
This dessert is perfect for family reunions, summer picnics, or Sunday night dinners. Serve it cold with a glass of cold milk or hot coffee. At holidays, it pairs beautifully with spiced cider or mulled wine. For a nostalgic touch, I like to serve it in vintage dessert dishes handed down from my mom.
If you’re hosting a dinner party, serve smaller portions in glass parfait cups for a more elegant presentation. And don’t forget to bring this beauty to potlucks—it’s always the first thing to disappear from the table!
Helpful Tips
-
Chill Between Layers: Always refrigerate between steps. Each layer sets better and the final dessert looks more polished.
-
Use Cold Milk Only: Warm milk won’t allow the pudding to set properly.
-
Soften Cream Cheese Fully: This ensures a silky-smooth layer without lumps.
-
Slice with a Warm Knife: Dip your knife in hot water and wipe dry before slicing for clean, photo-worthy servings.
Prep Time: 25 minutes
Cooking Time: 0 minutes
Total Time: 4 hours 25 minutes (including chilling)
Nutritional Information (Per Serving)
-
Calories: 380
-
Protein: 4g
-
Sodium: 280mg
-
Sugars: 27g
-
Fiber: 1g
-
Total Fat: 20g (Sat Fat: 10g)
-
Cholesterol: 30mg
Common Mistakes to Avoid
-
Skipping Chill Time: This dessert needs time to firm up. Cutting too soon results in runny layers.
-
Using Warm Butter in Crust: Make sure the crust cools a bit before layering to avoid melting the cream cheese.
-
Not Beating Cream Cheese Enough: Lumps will ruin the texture, so make sure it’s whipped smooth.
-
Overmixing Pudding: This can break down the structure, so whisk until just thickened.
Conclusion
Chocolate Lasagna is more than just a dessert—it’s a memory maker, a comfort food, and a testament to the joy of simple, layered flavors coming together in harmony. Whether you’re whipping it up for your grandkids, bringing it to a church potluck, or simply treating yourself after a long week, this dessert delivers smiles in every bite.
If you’ve got your own version or a family twist, I’d love to hear about it. Food, after all, is meant to be shared—from our kitchens to yours, and from one generation to the next.
Frequently Asked Questions (FAQs)
Q: Can I make this dish ahead of time?
A: Yes! In fact, it’s better when made the night before. It allows the layers to firm up and the flavors to meld.
Q: What can I use as a substitute for cream cheese?
A: You can use mascarpone for a slightly sweeter taste, or Greek yogurt for a tangier, healthier option.
Q: How do I store leftovers?
A: Keep them in an airtight container in the refrigerator for up to 4 days. The crust may soften slightly but the flavor remains delicious.
Q: Can I make this recipe gluten-free?
A: Absolutely! Just use gluten-free chocolate sandwich cookies in place of Oreos.

CHOCOLATE LASAGNA WITH OREO CRUST AND WHIPPED TOPPING
- Total Time: 4 hours 25 minutes
Ingredients
For the Crust:
-
1 package (about 36 cookies) Oreos, finely crushed
-
6 tablespoons unsalted butter, melted
For the Cream Cheese Layer:
-
1 package (8 ounces) cream cheese, softened
-
1/4 cup powdered sugar
-
1 teaspoon almond extract (or vanilla extract, if preferred)
-
1 cup Cool Whip (or homemade whipped cream)
For the Pudding Layer:
-
2 packages (3.9 ounces each) instant chocolate pudding
-
3 1/4 cups cold milk
For the Topping:
-
1 1/2 cups Cool Whip (or more, depending on preference)
-
Chocolate shavings, mini chocolate chips, or Oreo crumbles for garnish
Optional Add-Ins or Swaps:
-
Use gluten-free sandwich cookies for a gluten-free version.
-
Swap almond extract for peppermint during the holidays for a festive twist.
-
Use light Cool Whip or reduced-fat cream cheese for a lighter version.
-
Add a thin layer of caramel sauce between the pudding and whipped topping for a turtle-style treat.
Instructions
Start by crushing your Oreos. I like to toss them in a food processor for a nice fine crumb, but you can also place them in a zip-top bag and crush them with a rolling pin—just like my mother used to do. Combine the crushed cookies with the melted butter and press the mixture firmly into the bottom of a 9×13-inch dish. Place the dish in the fridge to chill while you prepare the next layer.
In a medium bowl, beat the softened cream cheese with powdered sugar and almond extract until smooth and creamy. Fold in 1 cup of Cool Whip and mix gently. Once combined, spread this mixture evenly over the chilled Oreo crust. Use an offset spatula to make the layer smooth. Return the dish to the fridge to firm up while you work on the pudding.
In a separate bowl, whisk together the instant chocolate pudding mixes and cold milk until thickened—this usually takes 2-3 minutes. The pudding should be thick but spreadable. Carefully spread the pudding over the cream cheese layer. Be gentle to avoid disturbing the layers beneath.
Once the pudding layer is set, top the entire dessert with a generous layer of Cool Whip. Use a spatula to spread it evenly, creating soft swirls across the top for that classic homemade look.
Now for the fun part—garnishing! Sprinkle chocolate shavings, mini chocolate chips, or crushed Oreos over the whipped topping. For extra flair, add a dollop of whipped cream and a few dark chocolate curls just before serving. Chill for at least 4 hours, or overnight if you can wait. This allows the layers to set beautifully.
- Prep Time: 25 minutes
- Cook Time: 0 minutes
Nutrition
- Calories: 380
- Sugar: 27g
- Sodium: 280mg
- Fat: 20g
- Fiber: 1g
- Protein: 4g
- Cholesterol: 30mg